Studio K-Creation -
SIMS 4 Creation BLOG -Non-mainstream- by KARZALEE
How to make Transparent clothing
What you will need:
SIMS 4 Studio (I am using LOVE 2.4.0.9) download
blender 2.70
A 2D editor - Paint.net, Photoshop, and GIMP are popular choices but you can use any editor capable of handling .dds
This tutorial will show you how to make transparent clothing of an EA mesh.
It assumes you know how to create, map, texture, and recolor a mesh using Blender
and will not go over those steps.
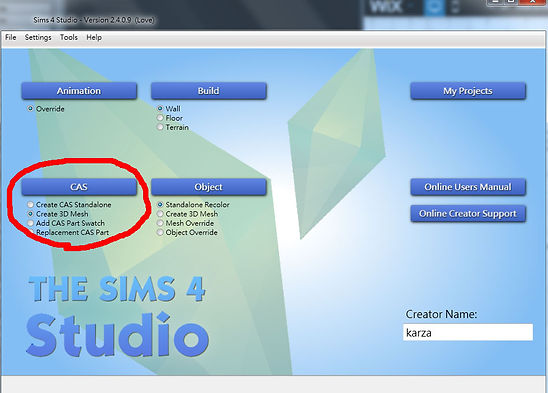
Step 1
>open sims 4 studio and select Create 3D Mesh at the CAS part
>Then click CAS
Step 2
>select the clothing you want
>I selected a long skirt as the photo
>Click NEXT to create a package file

Step 3
> open the new package file and export the mesh to blender format

Step 4
>you can see here are 4 mesh in the blender file

Step 5
> motify the shape you want, I am going to delete some front part, go to edit mode / solid , press C to select the part and press X to delected.

Step 6
>you will see the under bottom part, selected it and press X to deleted, because I don't need them.

Step 7
> The shape now finished, you can see the photo as below. But there are a IMPORTANT thing need to do if you want to make transparent. Need to add a NORMAL face to the inner part to the skirt.
Because if you forgot to add it, the back side will not showing at the front view.
>But if you do not have a cut hole like my mesh, then you can skip this step. just go to step 11

Step 8
> go to edit mode / click the square box, normal will show up to the mesh as a blue line.

Step 9
>press A to select all the mesh and hold SHIFT D to copy the mesh
>go to [mesh] -[Faces]-Flip Normals

Step 10
>the normals show as both side now.
>do same step to others mesh

Step 11
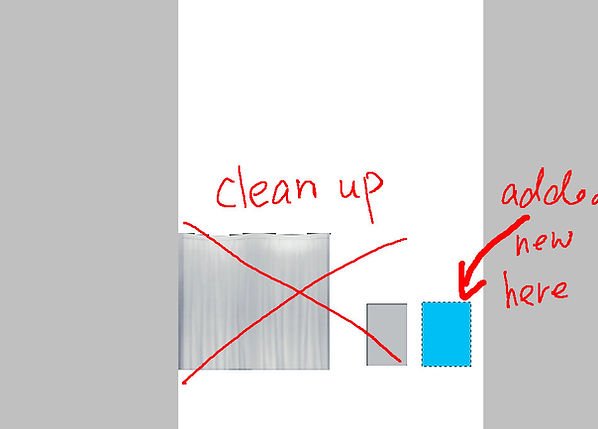
>open the package file and export the texture DDS file
>open in photoshop or other softwear you are using
>deleted the EA skirt texture and add a new solid color to the right part, because the transparent will overlap to the body, so you cannot use the same area to the body skin.
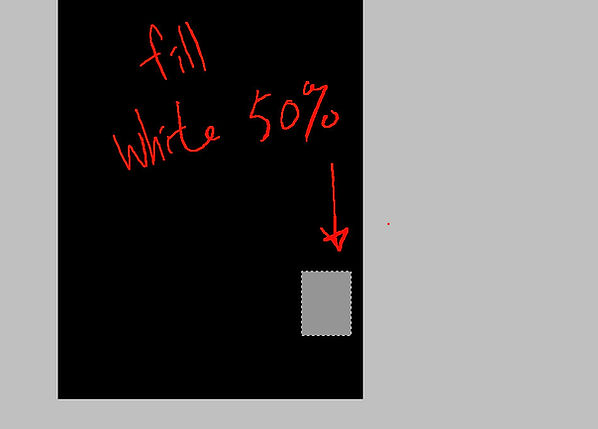
Step 12
> Revise the Alpha
>fill 50% white color to the alpha selected part
Step 13
>Save as DDS files

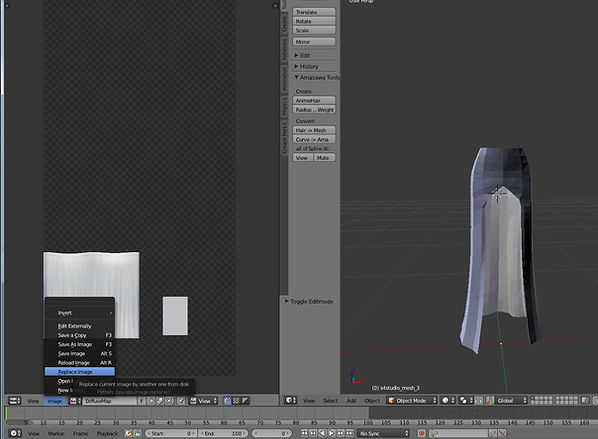
Step 14
>go to blender and find the diffuseMap at the UV/Image editor
>press Image and selecte replace image
>use the new dds to replace the EA one
Step 15
>add the leg to the skit, because the skirt can see though the back side now, we must have legs!!
>using Sims 4 studio selected a nude bottom and export the mesh to blender file
>Appen the leg to the file
>delete rig001
>Select the leg mesh and change the 0DiffuseMap,001 to DiffuseMap

step 16
>now I am going to remove the doubles face of the leg
>press A to selecte all the leg, go to mesh / Vertices / remove Doubles, you can see how many faces was delected at the top info bar

Step 17
>As the original mesh of EA have only 4 mesh, and now I got 5 mesh here.
>so I am going to join 2 of the bottom part of skirt become 1 mesh.
>select mesh 4 and then select mesh 1 , then go to Transform tool, click 'JOIN'

Step 18
>move all the mesh to the new area ( blue part)
>use A selected all and press S to scale down, then press G to move
>do same step to the other mesh, make sure all mesh move into the blue part

Step 19
>After move all the mesh into the blue area, you can see the mesh in texture view as below.
>some part are darker, this is because the skin texture Material


Step 21
> Replace the DiffuseMap_DiffuseMap to my new skin texture
>Now the texture become all in blue

Step 22
> fine-tuned the mesh
>some of the mesh was covered by the legs part, need to fine-tune by using sculpt or others tool you are using.

Step 23
>Now all the mesh showing at the top

Step 24
>rename the leg mesh to s4studio_mesh_4 if you want prefect
>then check the S4Studio CAS Tools
>make sure all the mesh have difference cut, for example
mesh_1 is GEOM 0001
mesh_2 is GEOM 0002
mesh_3 is GEOM 0003
mesh_4 is GEOM 0000
>Also make sure all the mesh are link to 'rig' as below photo


Step 25
> The LOD0 was finished
>But I wanna make a lower verion for LOD1, so save as the files called LOD1
>go to'add Modifer/ decimate

Step 26
>move the Ration bar to collapse the faces, check the effect, then apply the Decimate
>do the same step to all mesh
>then SAVE it

Step 25
> Now LOD0 and LOD1 was finished
>By the way ,if your mesh is "NEW "mesh, you need to make sure the Weight Paint and Vertex Paint are correct. As this skirt is EA mesh, so I don't need to change anything. Keep as it.
> open Sims4studio and import the mesh

Step 26
>import the mesh to LOD0 and LOD 1
>then open the warehouse tap, select the Geometry part which you want to be transparent

Step 27
>click the 'Data" and change the shader to "Simglass"
>make sure you have to change all the geometry which you want to be transparent

Step 28
> add a pantie to the DDS files
>don't forget to editing the Shadows file(RLE 2 Image) or just replace it with a empty DDS

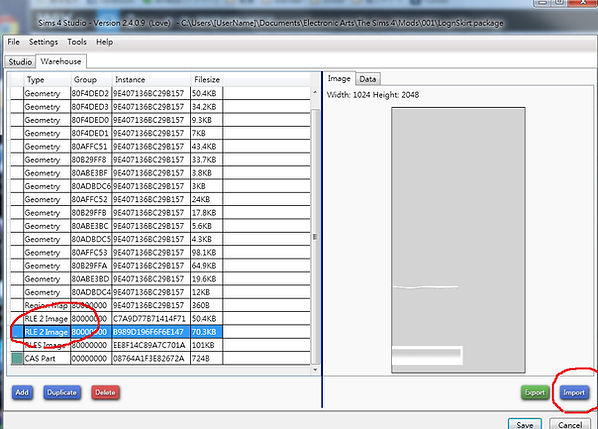
Step 29
> import the updated DDS to the texture and SAVE
>Then finished!!

Step 30
>Checking at the CAS part, which showing prefect!!
