top of page
Studio K-Creation -
SIMS 4 Creation BLOG -Non-mainstream- by KARZALEE
Step 8 : make a see-through lace at the chest and sleeves , click to the Alpha 1 channels and add a lace texture to the Alpha 1 (you can download some really nice PSD lace brush for this)
If you using PNG format, you can directly draw the lace to the layer, no Alpha channels
レースを胸元と袖に追加したいので、PSDのチャンネルAlpha 1にレースパターンをブラシで描きます。(PSD用レースブラシはネットで無料配布されているものがたくさんあります。好きなものをDLして使えばいいと思います。)
PNGファイルの場合はそのままレイヤーに描いていただいて結構です。Alpha 1 は必要ありません。
How to re-color a clothing Part 2
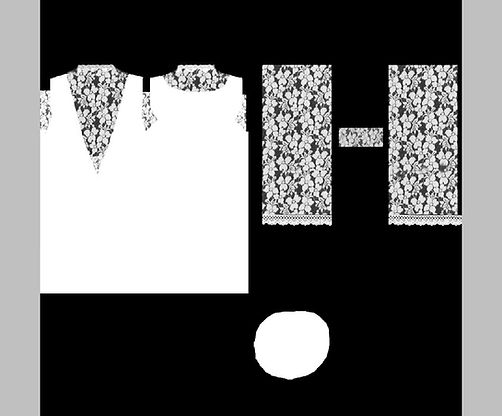

Step 9 : this is a concept of Layer / Alpha 1 and Alpha + RPG view for you. Alpha 1 is a mask, so your can draw anything at the layer but the game will only show the part of mask (Alpha 1), White part is showing on the game and Black part is hide.
下の図はレイヤーとアルファについて紹介します。レイヤーに何を描いてもゲーム中はアルファマスクをかけた部分しか表示されません。アルファチャンネルの白塗りはゲーム中に表示されるが、黒塗りは隠されます。

Step 10 : After finished the texture, Import to the texture box
Textureのボックスに新しく完成したテクスチャをインポートします。

Step 11 : import the specular map ( you can import a blank map or make a new one,depand on what you want)
Specular mapをインポートします。Specular mapとは光沢のマップです。←あくまでも私の自己流解説です。ゲーム中に光が当たるとよく光沢?が出るものだと理解して下さい。
(このステップは自分の好みで空白のマップ(光沢なし)や自分で再編集したマップをインポートするなりご自由に編集して下さい。)

Because I only want the dress area in specular effect. So I made the new one as below. And import to the package file.
ドレスの部分だけ光沢をつけたいので、その部分だけ白く塗っていきます。完成したファイルをパッケージファイルにインポートします。

Step 12 : import the RLE file. make a new one or replace to the blank one
RLEファイルをインポートします。RLEファイルは影を表現します。光が当たると当然影が出ます。自分は面倒なので。いつも空白なマップでインポートします。 講座パート1からDLできます。もし影を自分で作りたい場合はボディーUV mapを基本として、影を出したい所に灰色を塗って行けばいいと思います。影の濃いさは自分で調整して下さい。

Step 13 :All finished and checking at the CAS!! Thank you for reading my tutorial.
以上のステップを全部完成したら、CASで最終チェックです。これで完了です。講座を見ていただいてありがとうございました。

bottom of page